
You can learn to draw as an adult, and the part that needs training is probably not the part you expect. When psychologists tested why untrained people produce inaccurate drawings, hand control turned out to be a very minor cause. The main one was misjudging the object being drawn, so the skill you are building is mostly a way of looking, and a hand that can write a shopping list already has enough control to start.
That changes what practice should look like. Doodling from memory rehearses the habit that causes most of the errors in the first place. The seven exercises below work on seeing instead: drawing real objects, blocking in large shapes before detail, measuring with a pencil, drawing the gaps between things, checking angles, slow contour drawing and short daily sessions. Each takes ten to twenty minutes and needs a pencil, some paper and a mug.
Can you learn to draw as an adult?
Yes, and there is direct evidence that drawing accuracy improves with instruction. Rebecca Chamberlain and colleagues followed 42 art students through a five-month foundation drawing course, testing them three times, and published the results in Psychology of Aesthetics, Creativity, and the Arts in 2021. Their representational drawing improved over the course, and so did their mental rotation, their ability to spot a shape hidden inside a more complex figure, and their ability to switch attention.
A 2026 brain-imaging study by Safai and colleagues, published in Brain and Cognition, scanned 32 art students before and after 16 weeks of observational drawing instruction and compared them with 19 students who took no art classes. The drawing group showed stronger connections between brain networks involved in movement, attention and thinking, which is the kind of change that comes with learning a skill.
Both samples were students who had chosen a drawing course, so they were motivated and they were taught. Neither study promises that a particular person reaches a particular level in a particular time. What they show is that drawing accuracy responds to practice and teaching in the way other skills do, which is the question most adults are asking when they wonder whether it is too late.
Why do my drawings look wrong?
Most adult drawings go wrong because the drawer puts down what they know about an object in place of the shape in front of them. Dale Cohen and Susan Bennett tested four possible causes across four experiments, published in the Journal of Experimental Psychology: Human Perception and Performance in 1997: poor motor control, poor decisions about which lines to draw, misjudging your own drawing as you make it, and misjudging the object itself. By having people trace as well as draw, and by having separate groups judge the results, they could pull the causes apart.
Motor coordination came out as a very minimal source of error, decision-making as a relatively minor one, and misjudging one’s own drawing as no source at all. Misperceiving the object was the major cause. Because skilled and unskilled drawers showed similar patterns, the authors attributed it to what people believe about objects rather than to optical illusions, which is why the fix is practice in looking.
A 2026 paper by Aaron Hertzmann and Judith Fan, in Psychology of Aesthetics, Creativity, and the Arts, adds a second cause. Nobody sees a whole scene sharply at once: fine detail comes only from the small area you are looking at directly, and visual memory holds very little while you look down at the paper. Experienced artists work around this by switching their gaze between subject and page constantly, and by drawing a rough overall layout before any detail, so that each small decision is made inside a frame that is already right.
Both findings point to the same kind of practice: look at real things for longer than feels necessary, and work from large shapes to small ones.
How to start drawing: seven exercises that train your eye
The exercises run in a sensible order, but each one works on its own. Use an ordinary HB or 2B pencil, cheap paper and objects from around the house. Draw from real objects before photographs, because a real object makes you decide how three dimensions become two, and that decision, which a photograph has already made for you, is the skill you are training.
1. Draw one object from life, then compare it with one from memory
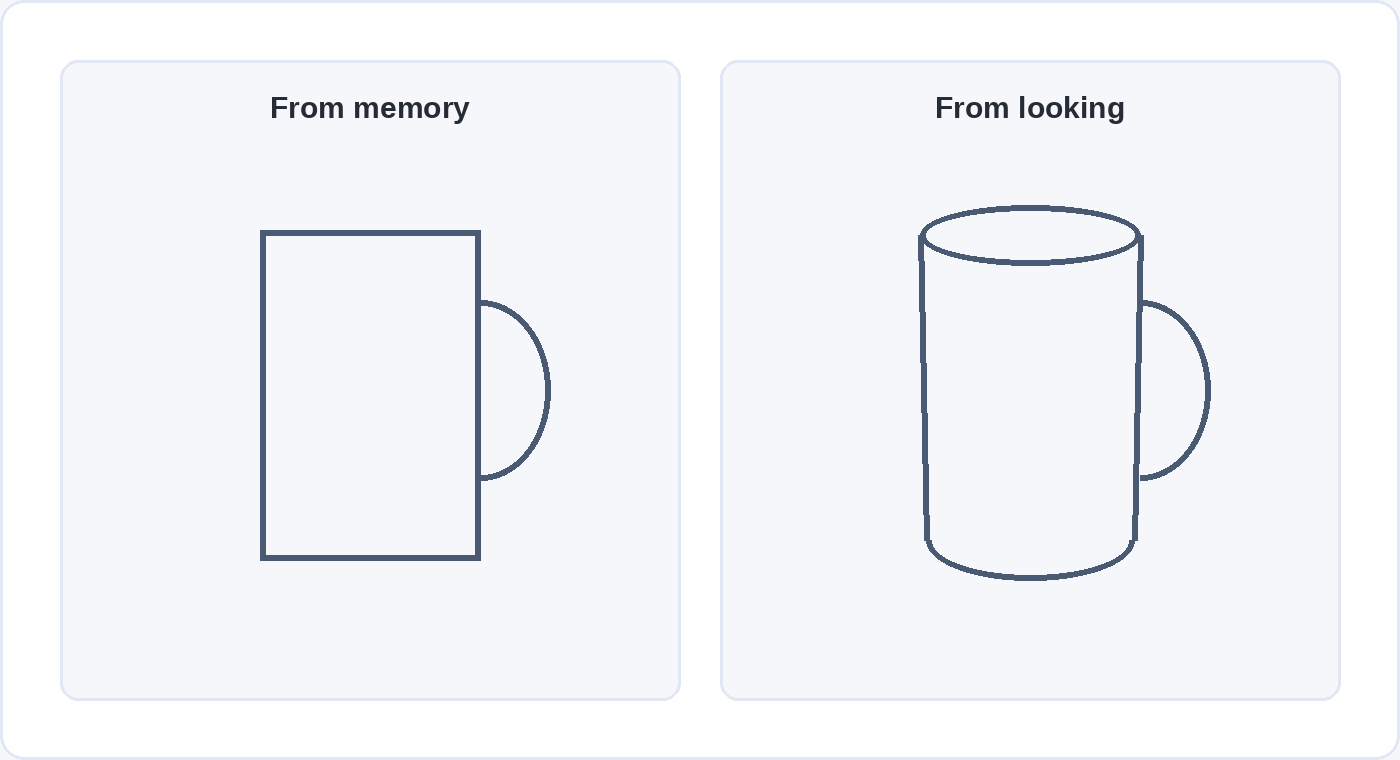
Put a mug on the table in front of you. First draw a mug from memory without looking at it, then draw the one in front of you, taking at least five minutes and looking at the mug more than at the paper. Put the two drawings side by side.
You know the rim of a mug is a circle, so the drawing from memory usually gets a flat top line or a full round circle. From a normal seated height the rim is an ellipse, and the base is a curve of the same kind, slightly rounder because it sits further below your eye. The knowledge that the rim is round is correct, and it produces a wrong drawing. The differences between your two drawings are a precise list of what your knowledge was overriding, and the drawings themselves do not matter. Repeat it with a bowl, an open book and a shoe.
2. Block in the big shapes before any detail
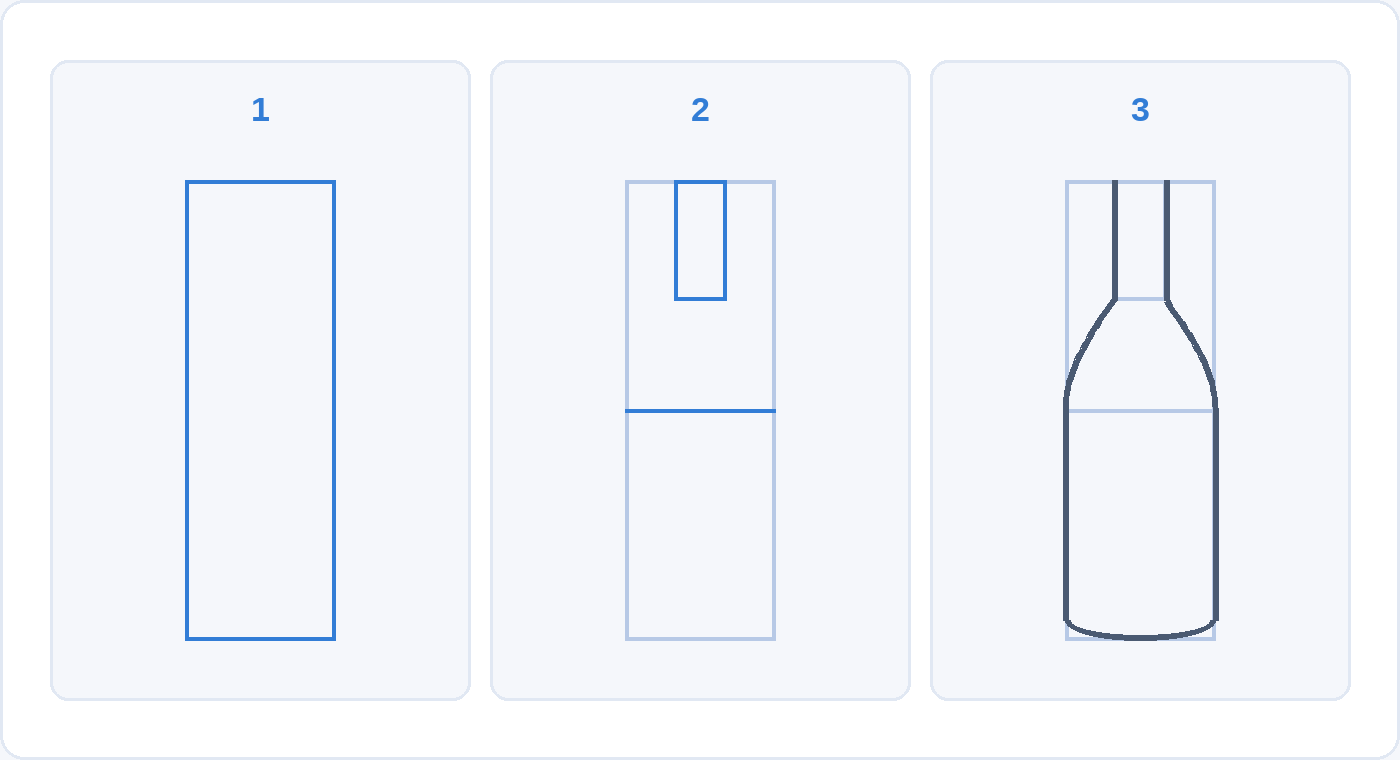
Start every drawing with light lines that fix the overall height, width and position of the object on the page, then divide that shape into its main parts, and only then draw edges and detail. This is the rough-to-refine order that Hertzmann and Fan describe in experienced artists, and it prevents the most common beginner result, a carefully drawn top half with no room left on the page for the bottom.
For a bottle, that means a tall box first, then a line where the shoulder starts and a narrower box for the neck, then the curves of the shoulder and the base. Keep the early lines light enough to disappear under the later ones.
3. Measure proportions with your pencil
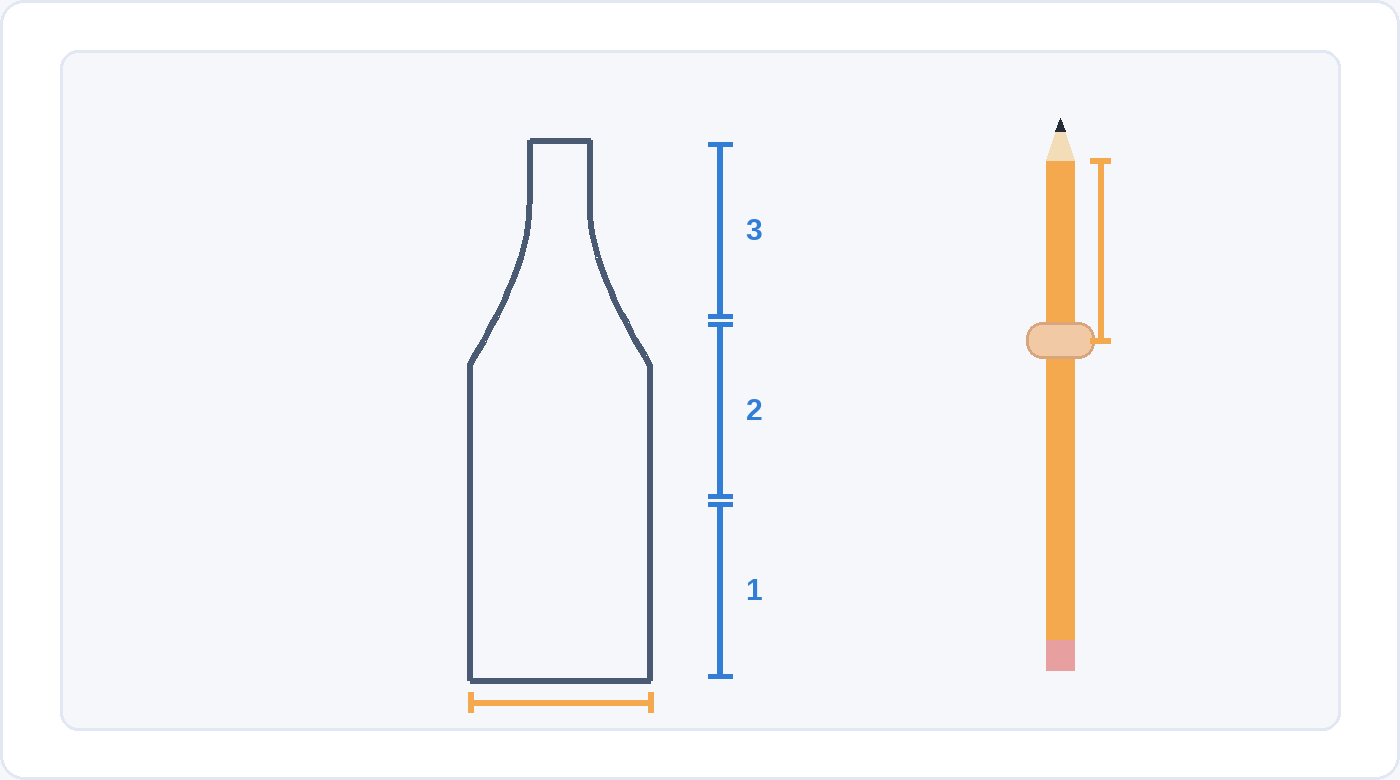
Hold your pencil at arm’s length with your elbow straight, close one eye, and line the tip up with one edge of the object. Slide your thumb along the pencil until it lines up with the opposite edge. That length becomes your unit, and every other distance can be checked against it: how many widths tall the bottle is, where the neck starts, how far down the label sits.
Keeping the elbow straight matters because the measurement only holds if the pencil stays the same distance from your eye. Drawing teachers call this sighting, and it is the quickest way to catch a proportion that your beliefs about the object have altered. The bottle in the figure below measures three of its own widths tall, and that is the number to check before you trust the outline.
4. Draw the empty spaces between things
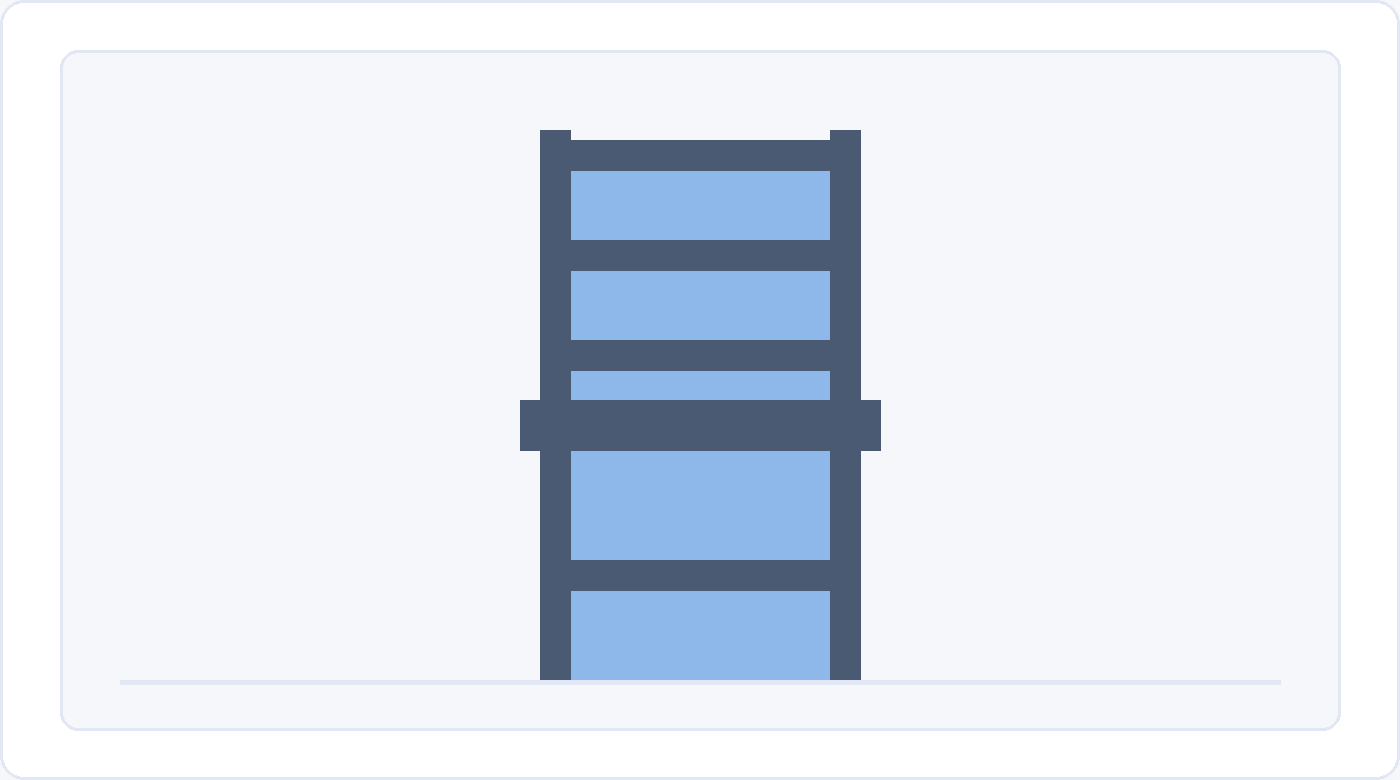
Look at a chair and draw only the shapes of the air between its legs, rungs and seat, as if those gaps were solid objects. Negative spaces have no name and no stored meaning, so your knowledge of chairs has nothing to correct. If the gaps come out the right shape, the chair around them will too.
The exercise works on anything with openings in it: a bicycle, a plant with separated leaves, a hand with the fingers spread, the space under a table.
5. Check every angle against a vertical
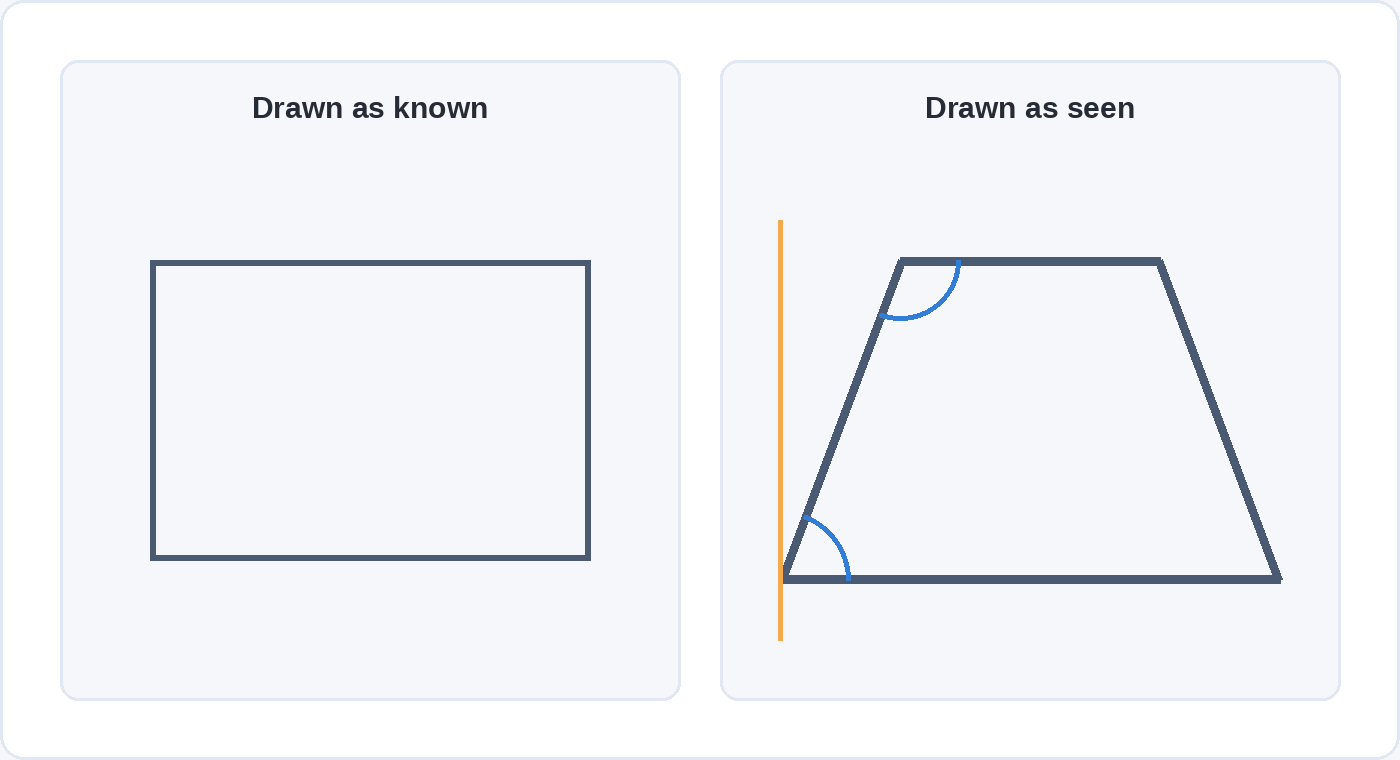
Angles are where memory overrides sight most often, because we know that tables, books and window frames are rectangular. To check one, hold your pencil perfectly upright at arm’s length, line it up with a corner of the object, and judge the angle between the pencil and the edge running away from it. Then draw the same angle against the side of your paper.
From where you sit, the corners of a rectangular table top are almost never right angles on the page. Seen from one end, the sides lean in towards each other as they recede, so the near corners close to less than 90 degrees and the far corners open to more. Drawn square, the table top reads as if it were seen from directly above.
6. Do slow contour drawings
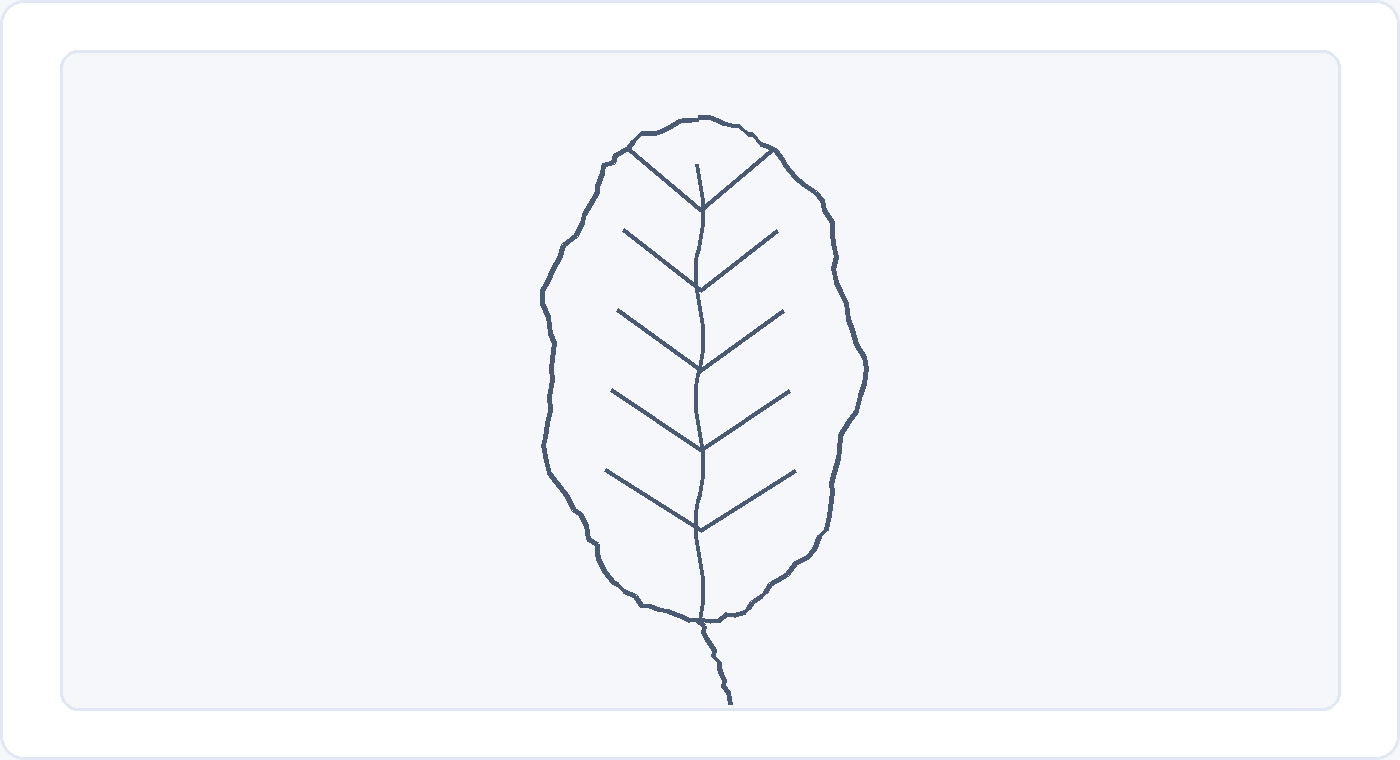
Pick an object with an interesting edge, such as your own hand, a leaf or a crumpled sheet of paper. Let your eye travel slowly along its edge and move the pencil at the same speed, looking at the object most of the time and glancing at the paper now and then. Take five minutes over something that would normally take one.
The traditional version, blind contour drawing, forbids looking at the paper at all. It produces odd, tangled results and is a good way to stop trying to make a nice picture. The version with regular glances keeps the same slow attention and gives you a drawing you can still read, and it is closer to the constant switching between subject and page that Hertzmann and Fan describe in skilled artists. Neither version has been tested in the kind of study quoted above, so treat contour drawing as a long-standing teaching exercise that builds attention to edges.
7. Draw little and often, and keep every page
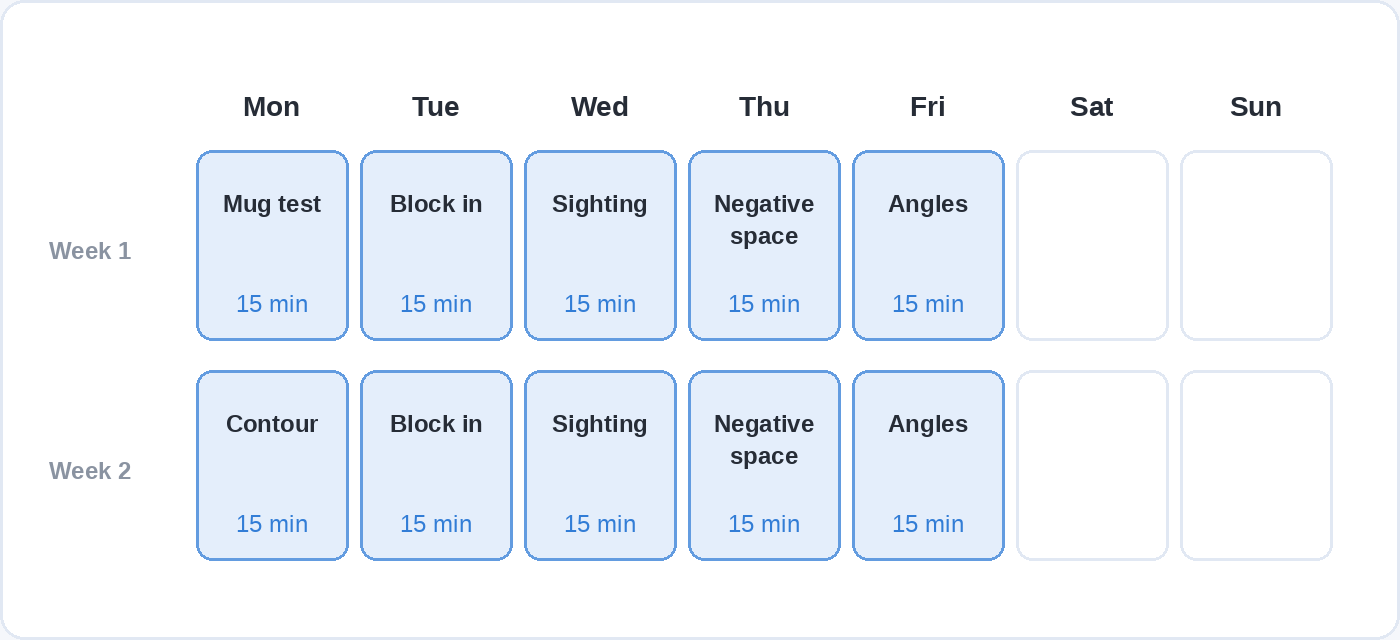
Fifteen minutes on five days of the week is likely to do more than one long session on a Sunday. Spreading practice out is one of the two study methods that learning researchers rate highest for usefulness, which we cover in our guide to the learning methods that work. Date every page and keep them all, including the bad ones, because progress in drawing is slow enough that you only notice it by comparing a page with one from several weeks earlier.
A simple rotation is to give each day one of the exercises above, drawing a different object each time, and to repeat the mug comparison from exercise 1 at the end of every month.
Does the upside-down drawing trick work?
For faces, where it has been tested, it appears to make drawings less accurate. The exercise comes from Betty Edwards’s book Drawing on the Right Side of the Brain: turn a picture upside down and copy it, so that you cannot recognise what you are drawing and have to copy the lines as they are. When Jennifer Day and Nicolas Davidenko tested it (Visual Cognition, 2018), their 12 untrained participants drew upright faces more accurately than inverted ones, judged both by geometric measurement and by other people rating the likeness. A separate 2015 conference study with 16 participants found the same.
The authors’ explanation is that we are experts at judging faces the right way up, and turning the face over takes away the expertise you need to check your own drawing. The theory behind the trick has aged too: a 2013 University of Utah study that scanned 1,011 people aged 7 to 29 found no evidence that individuals rely more on one side of the brain than the other. Copying upside down is still a pleasant way to slow yourself down, and the negative-space, sighting and angle exercises above tackle the same problem by giving you something to measure against.
What drawing does for you before you get good at it
Two effects of drawing turn up in adults regardless of skill. The first is memory. In experiments at the University of Waterloo published in 2016, students often recalled more than twice as many of the words they had drawn as of the words they had written out, and the quality of their drawings made no difference. A 2018 review by the same researchers, Myra Fernandes, Jeffrey Wammes and Melissa Meade, reported that older adults recalled a larger share of drawn words than younger adults did, which narrowed the usual age gap in recollection. Sketching something you are trying to learn helps you remember it whether or not the sketch is any good.
The second is stress. In a 2016 Drexel University study published in Art Therapy, 39 adults aged 18 to 59 spent 45 minutes making art, and 75 per cent of them had lower cortisol levels afterwards. Previous art experience made no difference to the result. The session offered clay and collage materials as well as markers and paper, so the study is evidence about making art in general, with drawing as one part of it.
What do you need to start drawing?
A pencil, paper and something to draw are enough for the first few months. An HB pencil for light construction lines and a 2B for darker final lines cover almost everything, along with a plastic or kneaded eraser, a sharpener and a cheap A5 or A4 sketchbook that you will not mind filling with bad pages.
Leave colour, ink, charcoal and drawing tablets until the exercises above feel routine. Each one adds its own set of decisions, and the seeing problem stays the same whichever tool you hold. If drawing later pulls you towards design work, our piece on what graphic design involves explains what designers decide and which tools they use.
Questions adults ask about learning to draw
Is it too late to learn to draw at 40, 50 or 60?
No study we found suggests an age limit on learning to draw, and the memory benefit of drawing was larger in older adults than in younger ones. What usually changes with age is available time and patience with bad early pages, and fifteen-minute daily sessions help with both.
How long does it take to learn to draw?
Measure it in months. The art students in the Chamberlain study showed measurable improvement over a five-month course with three testing points. Day to day, progress is too slow to notice, which is why a dated sketchbook is the most reliable way to see your own.
Do I need talent to draw?
The research points to learnable habits of seeing. Hertzmann and Fan conclude that drawing skill comes from learning effective strategies, and Cohen and Bennett traced the errors of untrained drawers to how they perceive the object, which is the part that practice trains.
Should I draw from photos or from real objects?
Start with real objects. A photograph has already turned three dimensions into two, and that conversion is the step you are learning to make yourself. Photos become useful later, for subjects that will not sit still.
Should I start on paper or on a tablet?
Paper is cheaper, has nothing to set up, and the skills carry over to a tablet later. A tablet’s undo button also makes it easy to keep redrawing a line instead of learning to judge it before you put it down.
Do I need to learn anatomy before drawing people?
Not at the start. Draw objects until blocking in, sighting and angle checks feel automatic, then move on to hands and faces with the same methods. Anatomy helps most when you draw figures from imagination, which is a later and separate skill.
Where to go after the first few weeks
The exercises above will carry you through the first month on your own. After that, a course taught by a real instructor helps because someone shows you where to look and what to practise next. Soofos has more than 40 free online courses, and painting is one of the subjects you can start without paying, so browse the free courses and pick one to run alongside your fifteen minutes a day.