










Your video is too big to email or upload, and you just want to send it. Here you learn how to reduce video file size with a few simple settings and tools, and what each step does to the quality, so you can choose what you are happy to give up. The short version: decide where the video is going, cut what you don’t need, lower the resolution to fit the screen it will be watched on, and only then lower the bitrate, checking the result each time.
Why your video file is so big
A video file is big because it stores a long row of pictures plus a sound track, and every second adds more of both. At 30 frames per second, one minute of video holds 1,800 separate pictures. The camera does not save each one in full (it stores what changes from one picture to the next), but the data still adds up quickly.
The length of the video counts in a simple way. If the camera writes the same amount of data every second, a clip twice as long is roughly twice as big. A two-minute clip of the same scene and settings takes about twice the space of a one-minute clip, so trimming is the one change that saves space without touching the picture at all.
Resolution is the next factor. Phones and cameras now record in Full HD (1080p) or 4K, and the camera uses whatever resolution it is set to for every clip until you change it. A 4K picture has four times as many pixels as a 1080p picture (3840 by 2160 against 1920 by 1080), and each of those pixels has to be described in the file.
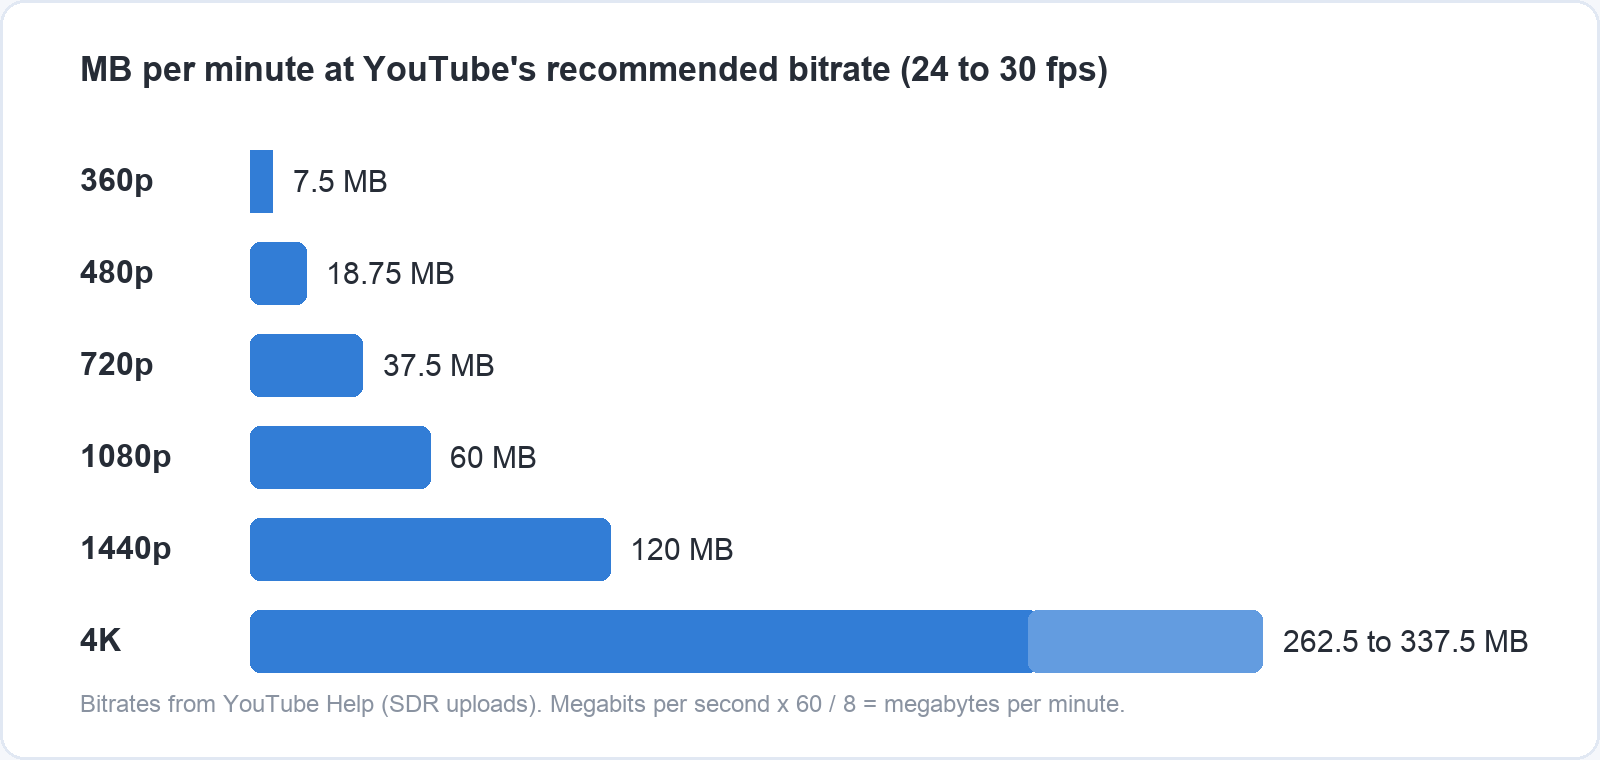
Bitrate is the measure that ties it together: it is how much data each second of video gets, usually written in megabits per second (Mbps). Divide by eight to get megabytes, and multiply by 60 for a minute. YouTube’s own recommended upload settings give a useful sense of scale: 8 Mbps for 1080p at 24 to 30 frames per second, which works out to 60 MB for every minute, and 35 to 45 Mbps for 4K, which is 262.5 to 337.5 MB a minute.
Before you start: what do you need the video for?
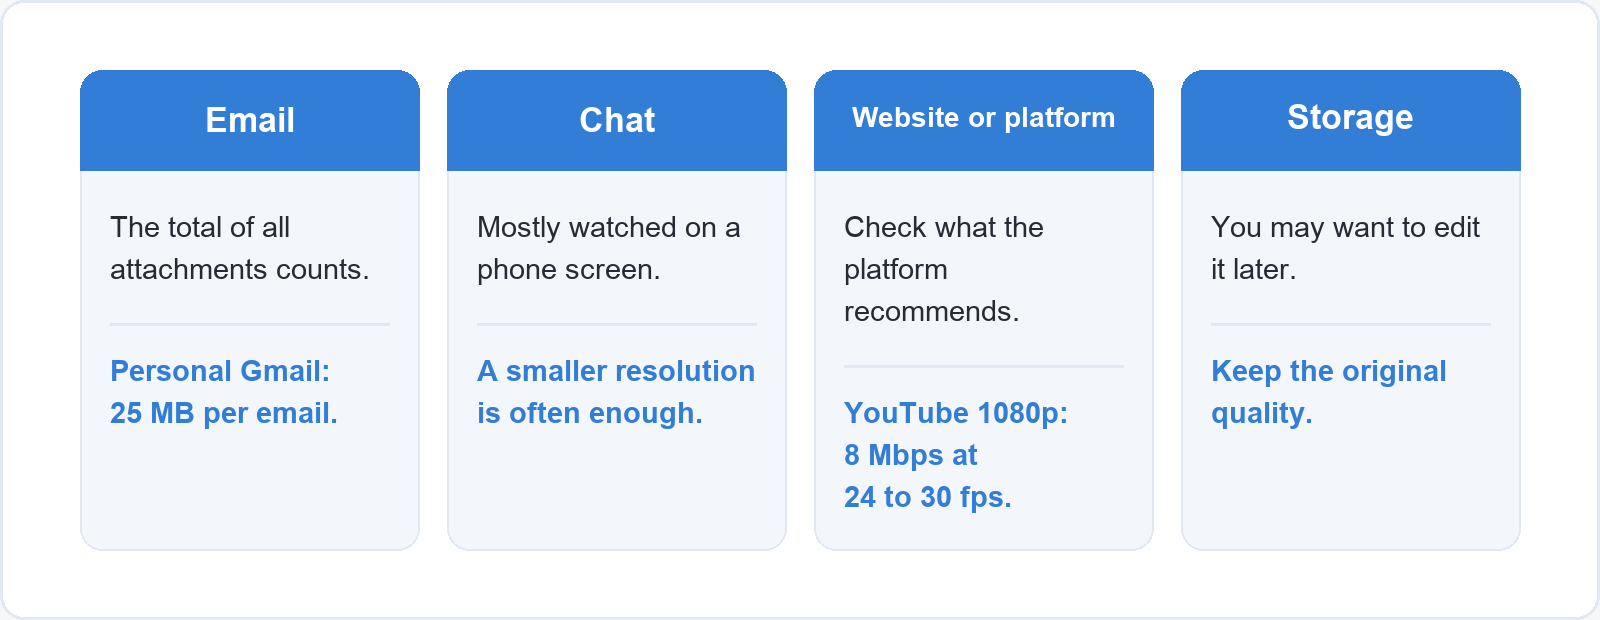
The right size depends on where the video is going, so decide that before you change a single setting. Sending by email, sharing in a chat, uploading to a website and keeping it in storage each ask for something different.
Email is the strictest. A personal Gmail account lets you send up to 25 MB in attachments, and that is the total of all files in the email, not per file. If you go over, Gmail removes the attachment and puts a Google Drive link in the email instead. At YouTube’s 1080p bitrate of 60 MB a minute, 25 MB holds about 25 seconds of video, so a longer clip needs a lower resolution, a lower bitrate or a link. Other email services set their own limits, so check yours before you start.
A chat app is mostly watched on a phone. A video for a small phone screen does not need the same quality as one for a big TV, because the phone cannot show the extra detail. A video for a website or a platform such as YouTube should follow what that platform recommends, since it will often process the video again after you upload it. A video you are storing, or may want to edit later, is the one you keep at full quality.
Whatever the destination, keep a copy of the original. Every smaller version should be a new file made from it, so you can always go back if the smaller version looks bad.
Settings you can change
Five settings decide the size of the file: resolution, format, bitrate, frame rate, and the sound and length. Most export screens show at least the first two, and a free converter shows all five.
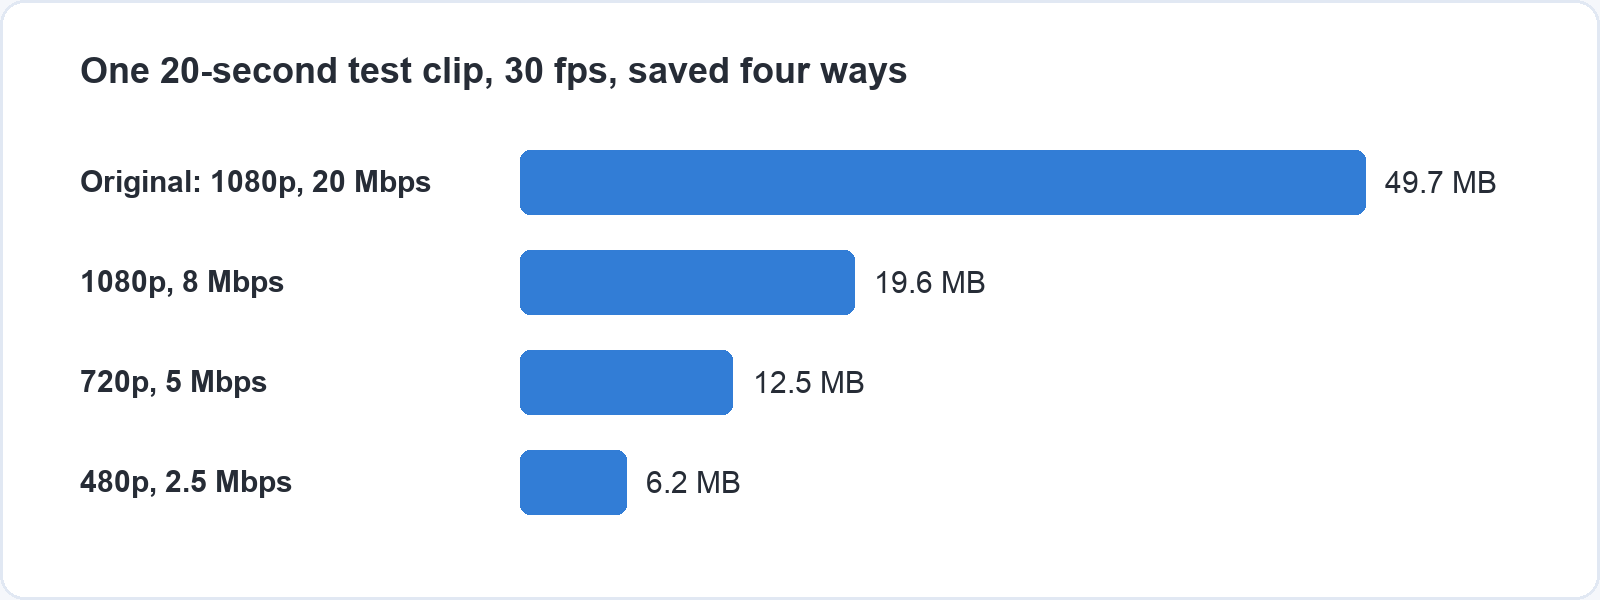
To see what resolution and bitrate do, we made a 20-second test clip (a slow pan across a drawn night scene, 30 frames per second) and saved it four ways. The original, saved at 1080p and 20 Mbps, was 49.7 MB. At 1080p and 8 Mbps it came to 19.6 MB, at 720p and 5 Mbps to 12.5 MB, and at 480p and 2.5 Mbps to 6.2 MB.
What happens when you lower the resolution?
Going down one step in resolution makes the file a lot smaller, and on a phone screen you often hardly see the difference. A 720p picture has a little under half the pixels of a 1080p picture (921,600 against 2,073,600), and YouTube recommends 5 Mbps for 720p against 8 Mbps for 1080p. Microsoft describes 720p in its Clipchamp editor as great quality for social media videos such as Instagram and TikTok posts, and 480p as the smallest option, suited to demo videos and drafts.
Does the format change the size?
Some formats store the same video in less space than others. The two you will meet most are H.264, which almost every device can play, and HEVC (also called H.265), which is newer and more efficient. Apple’s QuickTime Player shows the trade-off in plain words: when you export at 1080p or 4K, you choose between “Smaller File Size”, which saves as HEVC, and “Greater Compatibility”, which saves as H.264. Pick HEVC when you know the person receiving it can play it, and H.264 when you are not sure. The container (MP4 or MOV) matters much less than the codec inside it.
How low can you take the bitrate?
Lowering the bitrate makes the file smaller in direct proportion: half the bitrate gives roughly half the file. Go too far and the picture gets blocky or blurry, because the encoder no longer has enough data to describe each frame. Fast movement, fine detail such as leaves or water, and dark scenes need the most data, so they fall apart first. The YouTube figures above are a sensible floor for a video people will watch on a large screen; for a phone, you can usually go lower.
Should you change the frame rate?
Fewer frames per second saves space, but fast movement looks less smooth. YouTube’s own figures show the size of the effect: for 1080p it recommends 8 Mbps at 24 to 30 frames per second and 12 Mbps at 48 to 60. If your phone recorded at 60 and the video is a talk or a screen recording, saving it at 30 is a reasonable cut. For sport, dance or a moving camera, keep the higher rate and save space elsewhere.
What about sound and length?
Cut the parts you don’t need first: the seconds before you pressed start properly, the end where you reach for the phone, a pause in the middle. Remember the audio takes space too. YouTube recommends 384 kbps for stereo sound, which is about 2.9 MB a minute, and 128 kbps for mono. For a spoken video, mono or a lower audio bitrate saves a few megabytes that you can give to the picture instead.
Tools you can use
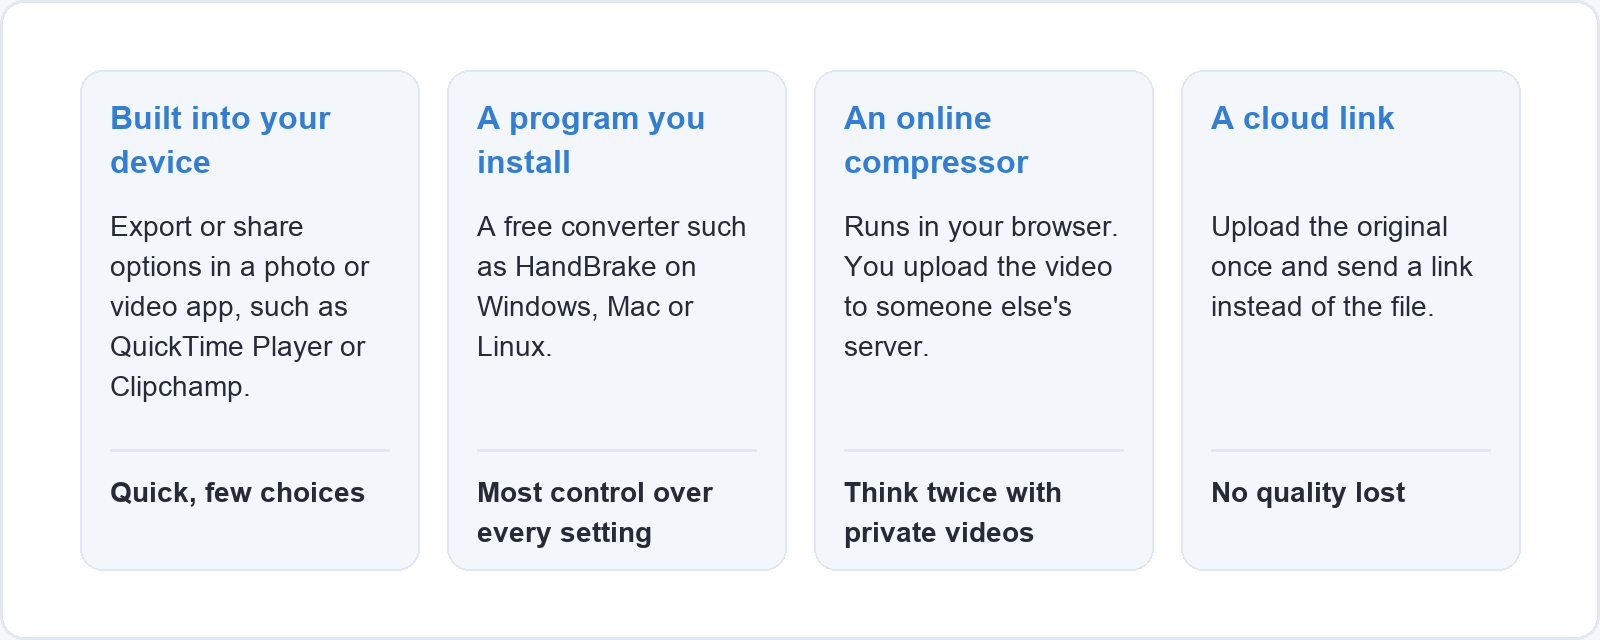
You can make a video smaller with a tool already on your phone or computer, a free program you install, an online compressor, or by not shrinking it at all and sending a link. Each one is a different balance between ease, control and privacy.
The quickest route is the export or share option in the video or photo app you already have. On a Mac, QuickTime Player’s File > Export As menu offers 4K, 1080p, 720p and 480p, and dims the options that are larger than your video. Clipchamp, Microsoft’s video editor, offers 480p, 720p, 1080p and 4K when you save a video. On a phone, the editing or share screen in the photo app is the place to look for a size or quality choice. These tools give you few choices, which is fine when you only need to go down a resolution step.
A free program you install on your computer gives you more control. HandBrake is a free, open-source converter for Windows, Mac and Linux. It lets you set the resolution, the codec (H.264 or H.265, among others), a quality level or an average bitrate, the frame rate and the audio separately, shows a preview before you save, and comes with ready-made presets for common devices if you would rather not touch each setting.
Online compressors run in your browser and are quick and easy: you drop the file in and download a smaller one. The catch is that you upload your video to someone else’s server, so think twice with private videos, such as footage of your children, a medical appointment or anything from work that is not public.
Sometimes the best option is not to shrink the video at all. Upload the original once to cloud storage such as Google Drive, OneDrive, iCloud or Dropbox, and share a link. The person receiving it gets the full quality, and you avoid every trade-off in this article. Gmail already does this for you when an attachment is over 25 MB.
What you lose in quality, and how to keep it small
Every time you compress, you lose some detail, and you can’t get it back from the smaller file. Lowering the bitrate throws data away for good. Saving the small file again at a higher bitrate makes it bigger without bringing the detail back.
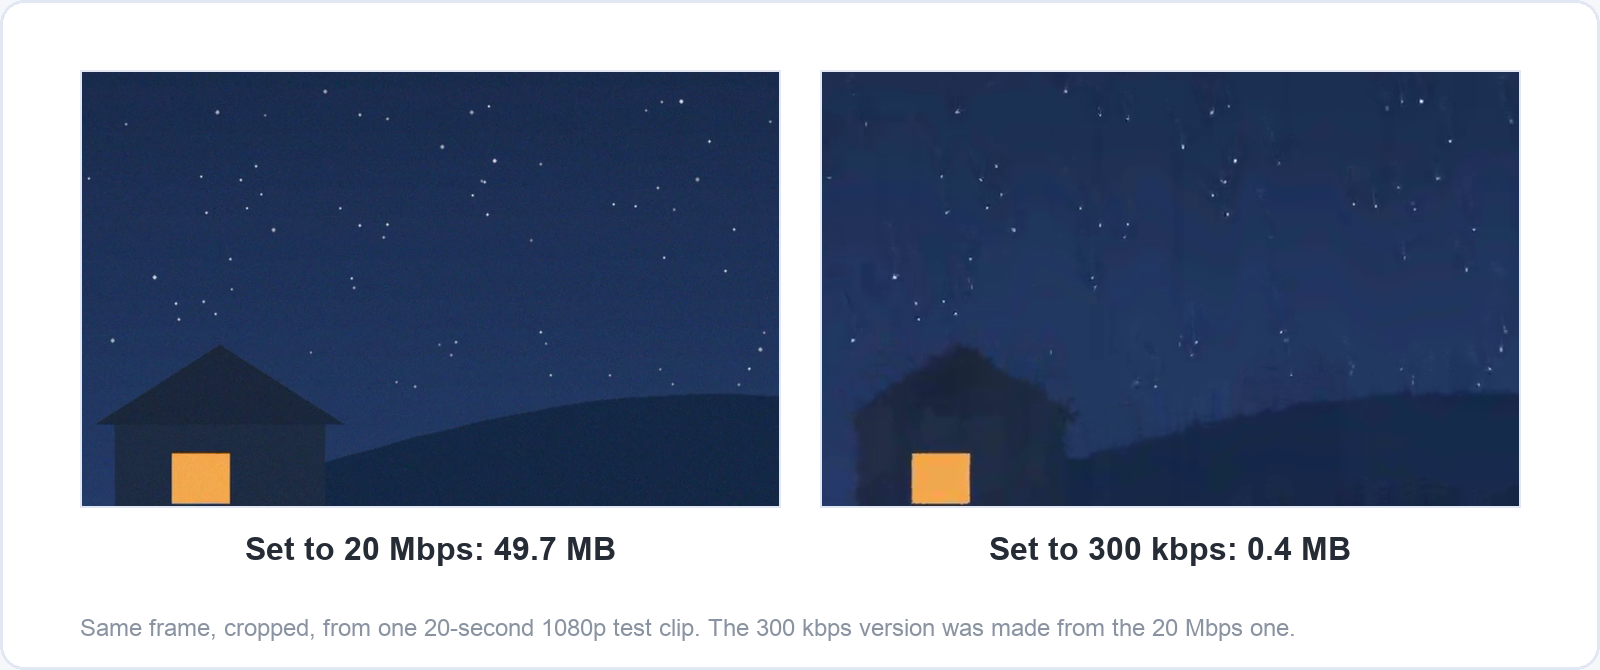
The signs that you went too far are easy to spot once you know them: blocks in dark areas and in smooth surfaces such as a sky or a wall, blurry faces, edges that smear when something moves, and sound that sounds flat or out of sync with the picture. Our test clip shows the first ones clearly. Set to 300 kbps instead of 20 Mbps, the same 20 seconds shrank from 49.7 MB to 0.4 MB, and the night sky turned blotchy, the stars smeared and the roof of the house lost its outline.
To keep the file small without reaching that point, change one setting at a time and check the result, instead of turning everything down at once. Start with the length, then the resolution, then the bitrate, and watch the new file on the kind of screen it is meant for before you send it. Look at a dark scene, a face and a moment with movement, because those show problems first.
Always compress from the original, not from a version you already made smaller. Each round of compression adds its own losses on top of the last one, so a second pass on an already small file looks worse than one pass from the original to the same size.
A simple order to follow
The order below gives you the smallest file for the least loss, because it starts with the changes that cost no quality and ends with the ones that do.
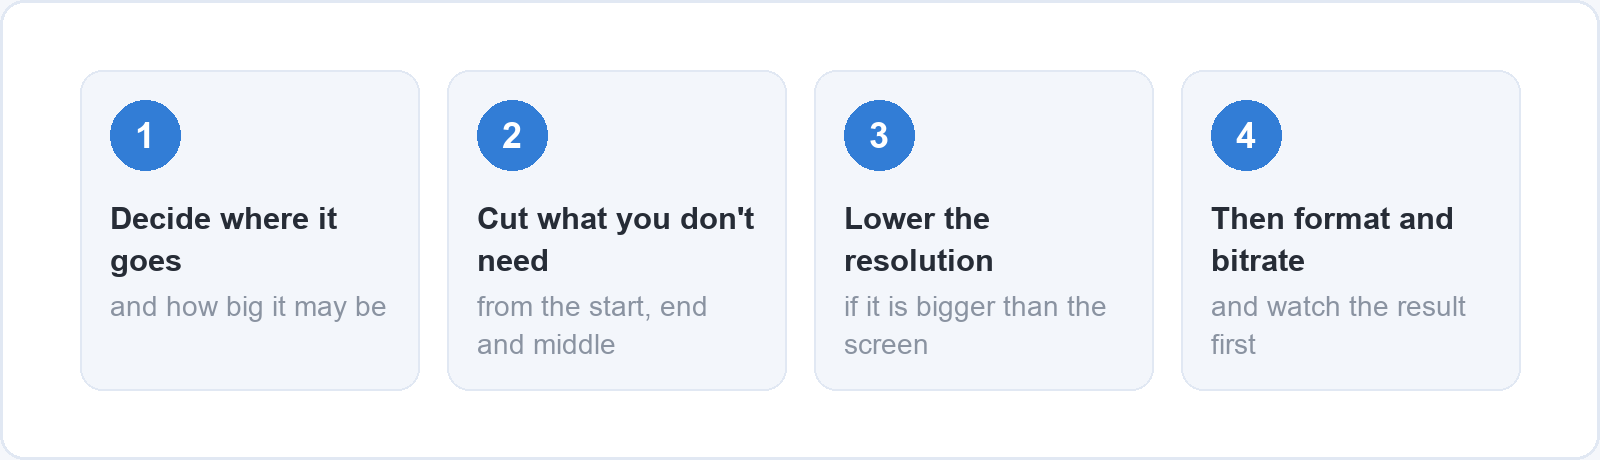
- Decide where the video is going and how big it may be. Write the limit down: 25 MB for a personal Gmail attachment, the platform’s recommendation for an upload, or no limit for storage.
- Cut what you don’t need. Trim the start and the end, and remove any part in the middle that adds nothing. This saves space without changing the picture.
- Lower the resolution if the video is bigger than the screen it will be watched on. A 4K video for a phone chat can go to 1080p or 720p; a 1080p video for an email can go to 720p or 480p.
- Only then play with format and bitrate, and watch the result before you send it. Choose HEVC if the receiver can play it, lower the bitrate a step at a time, and check a dark scene, a face and some movement before you press send.
If the file is still too big after step 4, share a link instead of making the video worse. If you film for work or for teaching, our guide on making an instructional video covers planning, recording and editing before you get to this point.
If you would like to keep learning new skills at your own pace, start with the free courses on Soofos: more than 40 online courses, completely free.