
An instructional video works when a viewer can do the task afterwards, so every decision in making one follows from the task: pick one, show the finished result first, script what the viewer sees alongside what you say, record it in short segments, and test it on someone who has never done it. You need a laptop, a decent microphone and a camera or a phone, and none of the eight steps below depends on expensive kit.
Most guides to this topic are written by companies that sell recording software, and they cover the plan-record-edit sequence well. What they leave out is how people actually use a how-to video once it exists. A study of 6.9 million viewing sessions on edX found that learners watched only two to three minutes of each tutorial video, whatever its length, and came back to tutorials more often than to lectures. People jump to the part they need, rewind it and try it, and the steps below are written for that way of watching.
What counts as an instructional video?
An instructional video shows someone how to carry out a specific task, step by step, so that they can repeat it on their own. That makes it different from a lecture, which explains an idea, and from a product demo, which tries to sell one. Researchers Hans and Jan van der Meij, whose eight guidelines for software training videos were tested in three studies on Microsoft Word’s formatting options, put the purpose plainly: people open a how-to video because they want to know what to do to complete a task, so the video should walk them through doing it.
The same approach works for a spreadsheet formula, a knot, a watercolour wash or a fault-finding routine on a machine. Throughout this guide the running example is a two-minute video on freezing the top row of a spreadsheet in Excel for Windows, a task small enough to show every step and common enough that someone will search for it.
Step 1: Choose one task and show the result first
Each video should teach one task with a clear start and a clear finish. If you notice that the task needs a pause halfway because a second job has started, you have two videos. In the van der Meij tutorial, adjusting the margins of a whole document was split into two videos, one for the right margin and one for the left, and each made sense without the other.
Put the task in the title as a verb and an object: “Freeze the top row in Excel”, not “Freeze panes” or “Excel tip 4”. The van der Meij guidelines recommend exactly this, because the title is what a viewer reads when deciding which of several videos to open, and a verb tells them what they will be able to do.
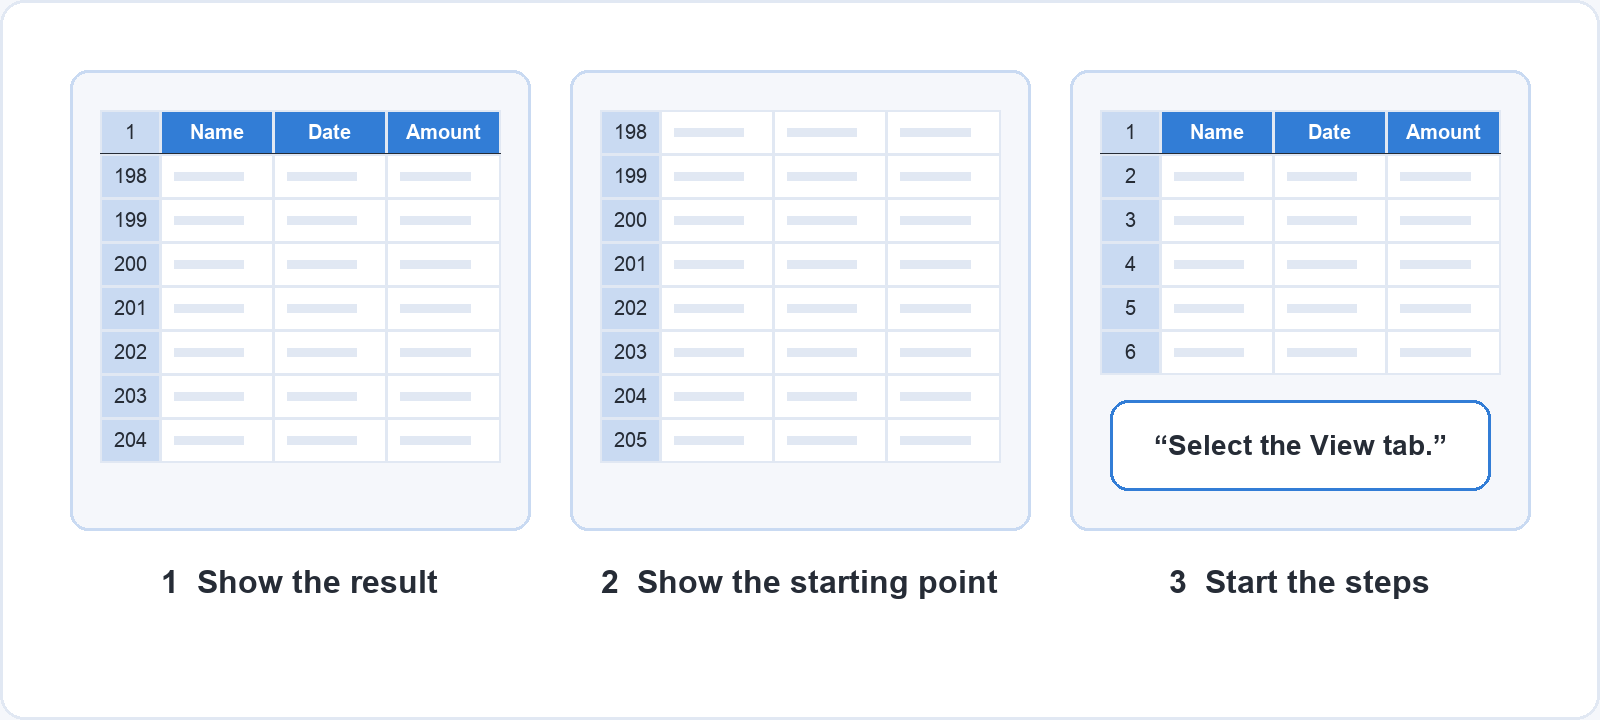
Then open the video with the finished result. A few seconds showing a long list scrolling while its header row stays put tells the viewer what they are about to learn and why it is worth two minutes. Show the starting point next (the same list with the headers scrolling out of sight), then begin the steps. Leave the explanation of how freezing works for another video, or for one sentence at the point where the viewer needs it.
Step 2: Do the task yourself and write a two-column script
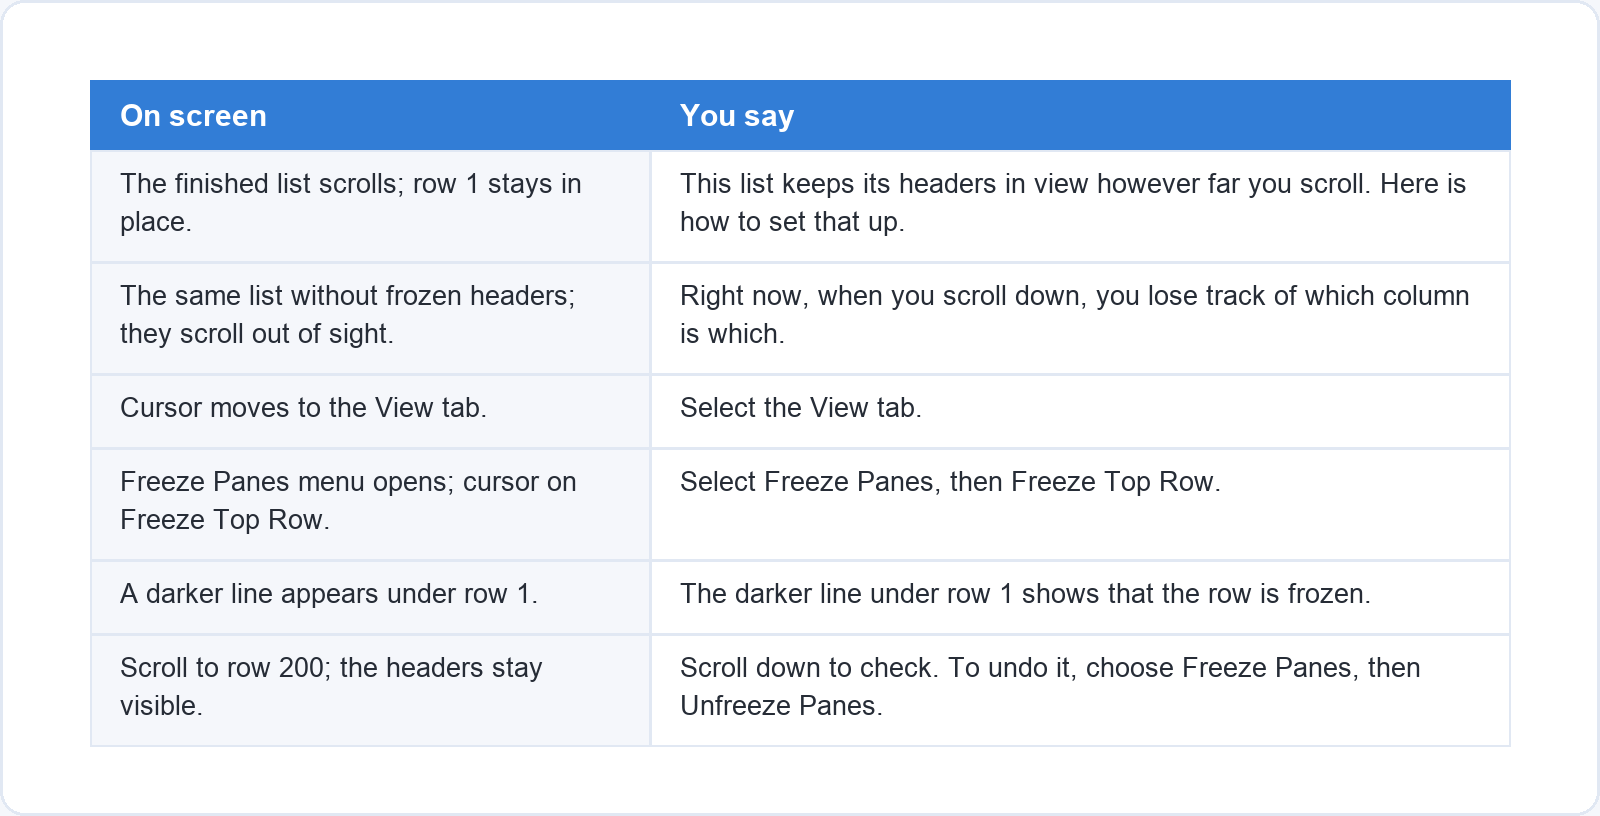
Before you write anything, do the task slowly and note every click, every choice and every moment where you had to look for something. Experts skip steps without noticing, and those skipped steps are exactly where a beginner stops. The van der Meij guidelines call this following the user’s mental plan: describe the actions in the order the viewer performs them and sees them on screen.
Write the script in two columns. The left column describes what is on screen, and the right column is what you say while it is there. Keep the instructions in the imperative (“Select View, then Freeze Panes”) and say each action as it happens, so that what the viewer hears and what they see never drift apart. Use “you” in the opening and closing, where you are explaining why the task matters; the research on conversational style summarised by Cynthia Brame in CBE Life Sciences Education found that a personal rather than formal register has a large effect on learning.
A full word-for-word script suits a screen recording, where the narration has to match the clicks. For a physical demonstration, many instructors work better from the left column alone and talk naturally, which is closer to what the edX study found most engaging.
Step 3: Choose the format by what the viewer has to see
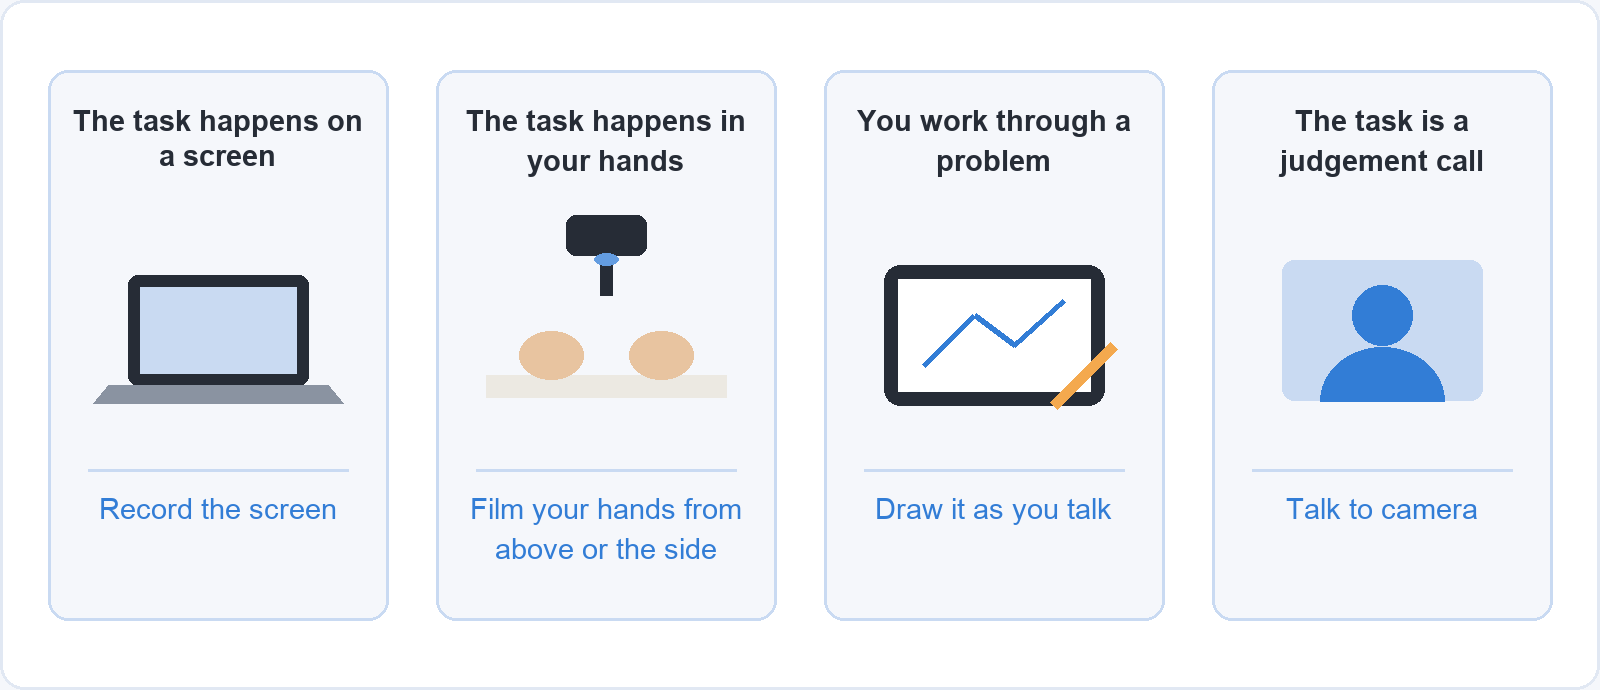
The format follows from where the action happens. If the task happens on a screen, record the screen. If it happens in someone’s hands, film the hands from above or from the side, at the angle the viewer will have when they try it. If the task is reasoning through a problem, drawing it as you talk works well. If the task is a judgement call, such as how to respond to a difficult customer, your face and voice carry the content.
The edX study compared these styles directly. Learners engaged for 1.5 to 2 times as long with tutorials drawn by hand on a digital tablet as with tutorials made from slides or code screencasts, and 40% of tablet-drawing sessions were followed by an attempt at the practice problem, against 31% for the other tutorials. The authors recommend bringing motion and continuous visual flow into tutorials, and if slides or code have to be shown, sketching over them to point things out. Videos that cut between slides and the instructor’s face also held attention better than slides alone.
You do not need a studio for any of these. The same study found that videos with a more personal, informal feel could be more engaging than high-production studio recordings, and its authors recommended filming in an informal setting where the instructor can make eye contact with the camera.
Step 4: Plan short segments that end where a sub-task ends
Keep each video short enough to cover one task, and break a longer task at the points where a sub-task is complete. The edX study recommends planning videos shorter than six minutes; Brame’s review notes that median engagement was close to 100% for videos under six minutes and around 20% for videos of 12 to 40 minutes. We have set out what that research means for a whole course in our guide to creating a free online course.
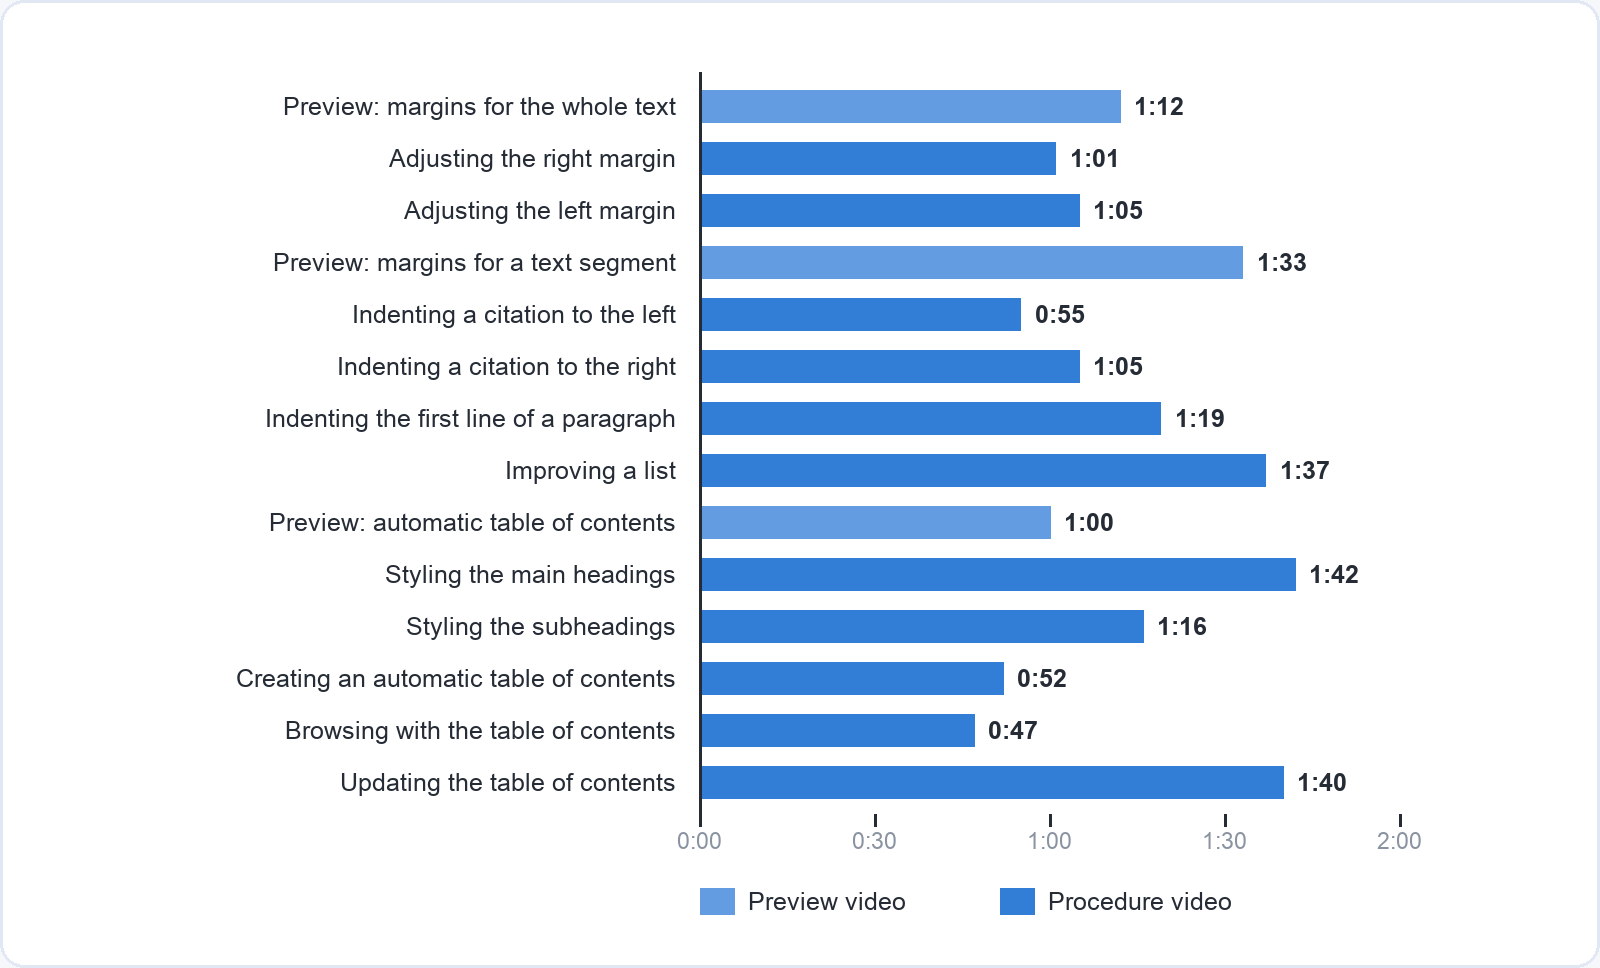
For how-to videos the van der Meij tutorial is a useful benchmark. Its fourteen videos on Word’s formatting options ran from 47 seconds to 1 minute 42, and the average was just over a minute. Each one covered a rounded-off task, and the preview videos that introduced each group were about the same length as the procedures.
A segment break works best at a natural boundary: the row is frozen, the formula is entered, the stitch is finished. Inside a single video you can mark the same boundaries with a short pause. Research cited in the van der Meij paper found that pauses as short as two seconds can help a viewer take in what they have just seen.
Step 5: Set up sound, light and the screen before you press record
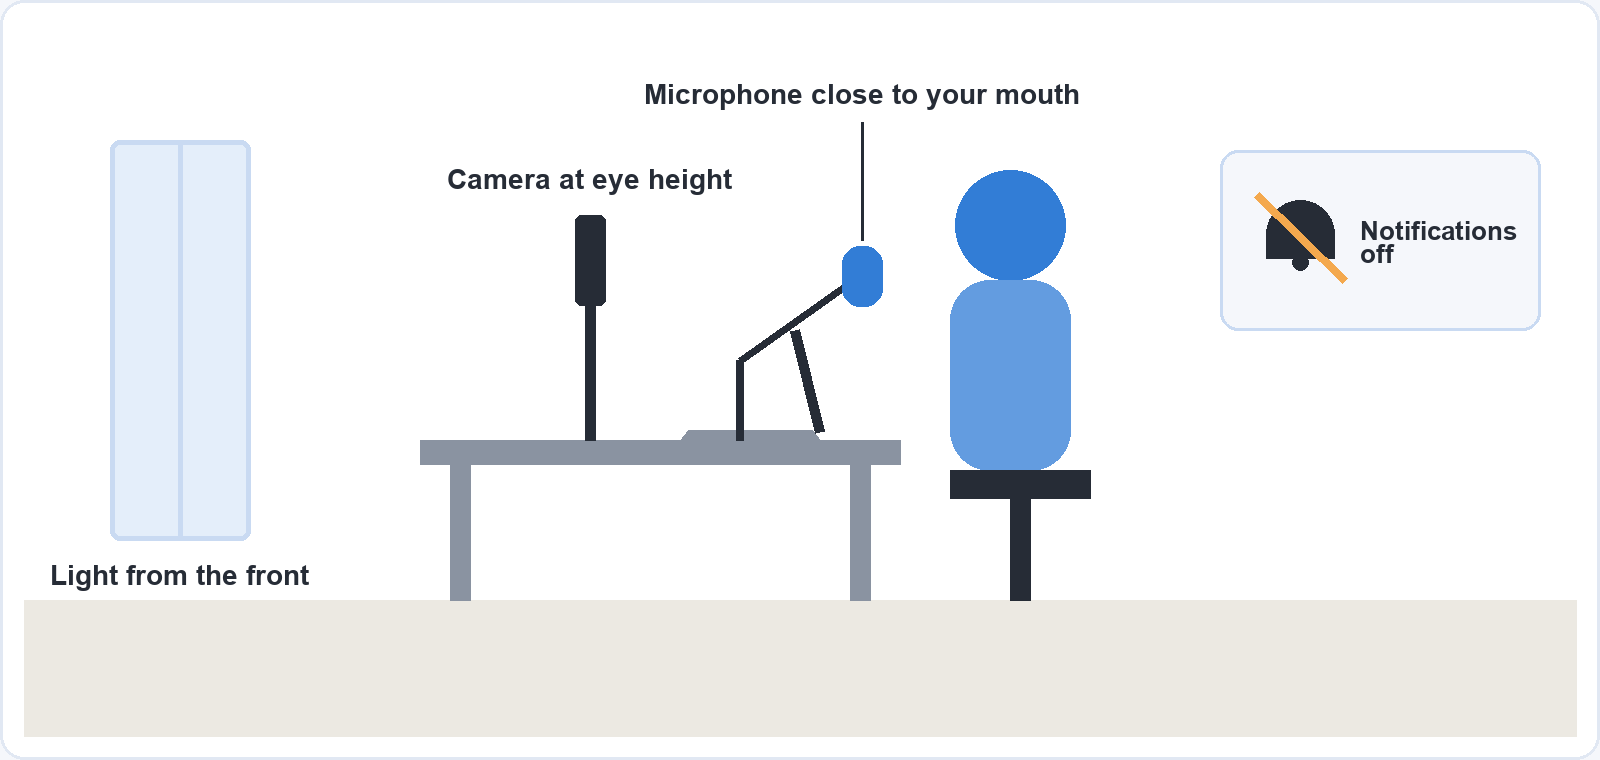
Get the sound right first: a viewer can follow a slightly soft picture, but not a voice they cannot make out. Put it close to your mouth and record in the quietest room you have, with soft furnishings rather than bare walls if you can. A phone propped at eye height and facing a window gives you even light on your face; a window behind you turns you into a silhouette. If you plan to publish on a course platform, check its minimum: Soofos, for example, asks for video of 720p or better with clear audio.
For a screen recording, prepare the screen as carefully as a film set. Turn off notifications, close every window you do not need, use a clean example file, and increase the size of the text and the cursor so they stay legible on a phone. Brame’s review calls removing everything that does not serve the lesson “weeding”, which in her list means dropping background music and complex backgrounds; a cluttered desktop falls under the same heading.
Step 6: Record in takes and speak at your normal pace
Record one segment at a time. If you stumble, pause, go back to the start of the sentence and say it again; you will cut the mistake later, and a run of clean short takes is far easier to edit than one long recording with errors in the middle.
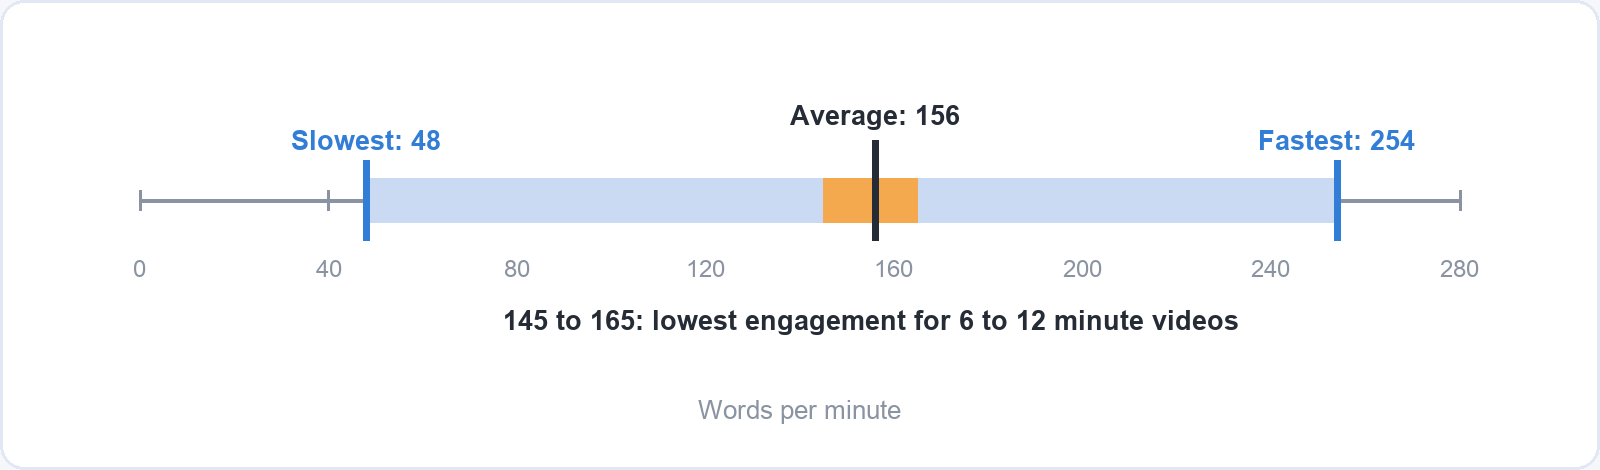
Many first-time instructors slow down because they think it helps. The edX study measured speaking rates from 48 to 254 words per minute, with an average of 156, and found that engagement generally rose with speaking rate. For six- to twelve-minute videos it dipped in the middle band of 145 to 165 words per minute, where the authors found the instructors the least energetic. They were clear that speed itself is not the cause: faster speakers sounded more enthusiastic, and forcing an unenthusiastic speaker to go faster would not help. Their advice to instructors was to speak with their natural energy and not to slow down on purpose.
The exception is the moment a step is completed. Leave a beat of silence there, with the result visible on screen, before you start the next step.
Step 7: Edit for the viewer who skips and rewinds
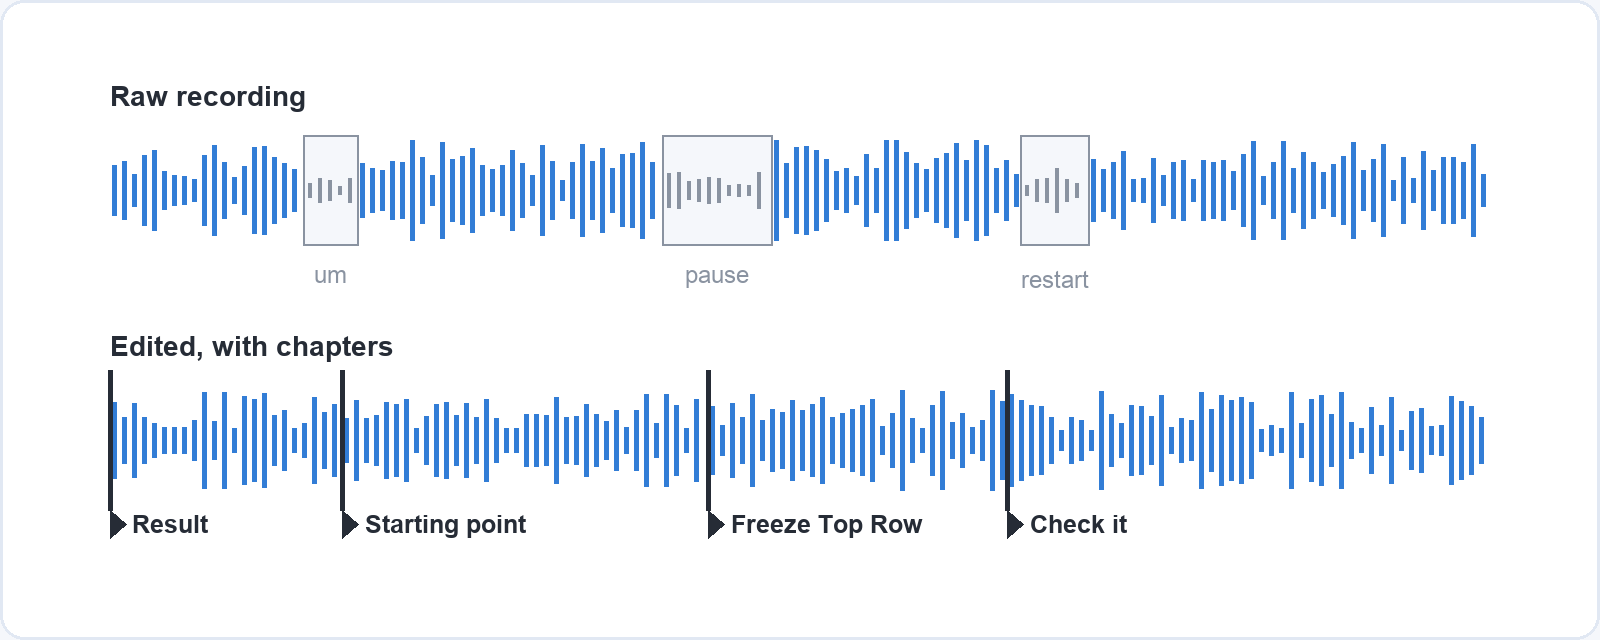
Edit out the filler words, false starts and long silences while you are looking for something. The edX production staff did this as a rule, on the reasoning that a pause that helps in a live lecture is unnecessary on video because the viewer can pause the video themselves.
Then add signals, but only where the narration needs them. A zoom on the menu you are about to click, a highlight around the cursor or a brief circle on the Freeze Top Row option all help, as long as each one appears at the moment you name the thing it points at. The van der Meij guidelines add that a signal should be clearly recognisable as something added, so the viewer never mistakes it for part of the software.
Avoid putting your narration on screen as text as well. Brame’s review recommends using sound and picture for complementary information rather than for the same words twice. Captions are a different matter: they belong in the player as a separate track, where viewers who need them can turn them on, and most video hosts and course platforms accept a caption file.
Finally, add chapter markers or a list of timestamps at each sub-task. Because tutorial viewers rewatch and jump to the step they need, the edX authors recommend visual signposts that make skimming easy, and a chapter list is the simplest version of that.
Step 8: Add a practice task and test the video on one real person
End the video with something to do. The van der Meij guidelines recommend pairing every demonstration with an exercise that states the starting point and the goal, and they cite an experiment in which practice after video instructions significantly improved performance compared with no practice. In a study on lecture videos by Szpunar and colleagues, students who answered short questions between segments of about five minutes did better on later tests and reported less mind wandering. For the Excel example the exercise can be one sentence: open the attached file, freeze the top row, scroll to row 200 and check that the headers are still visible. We cover practice and assessment design in more depth in our guide to building e-learning.
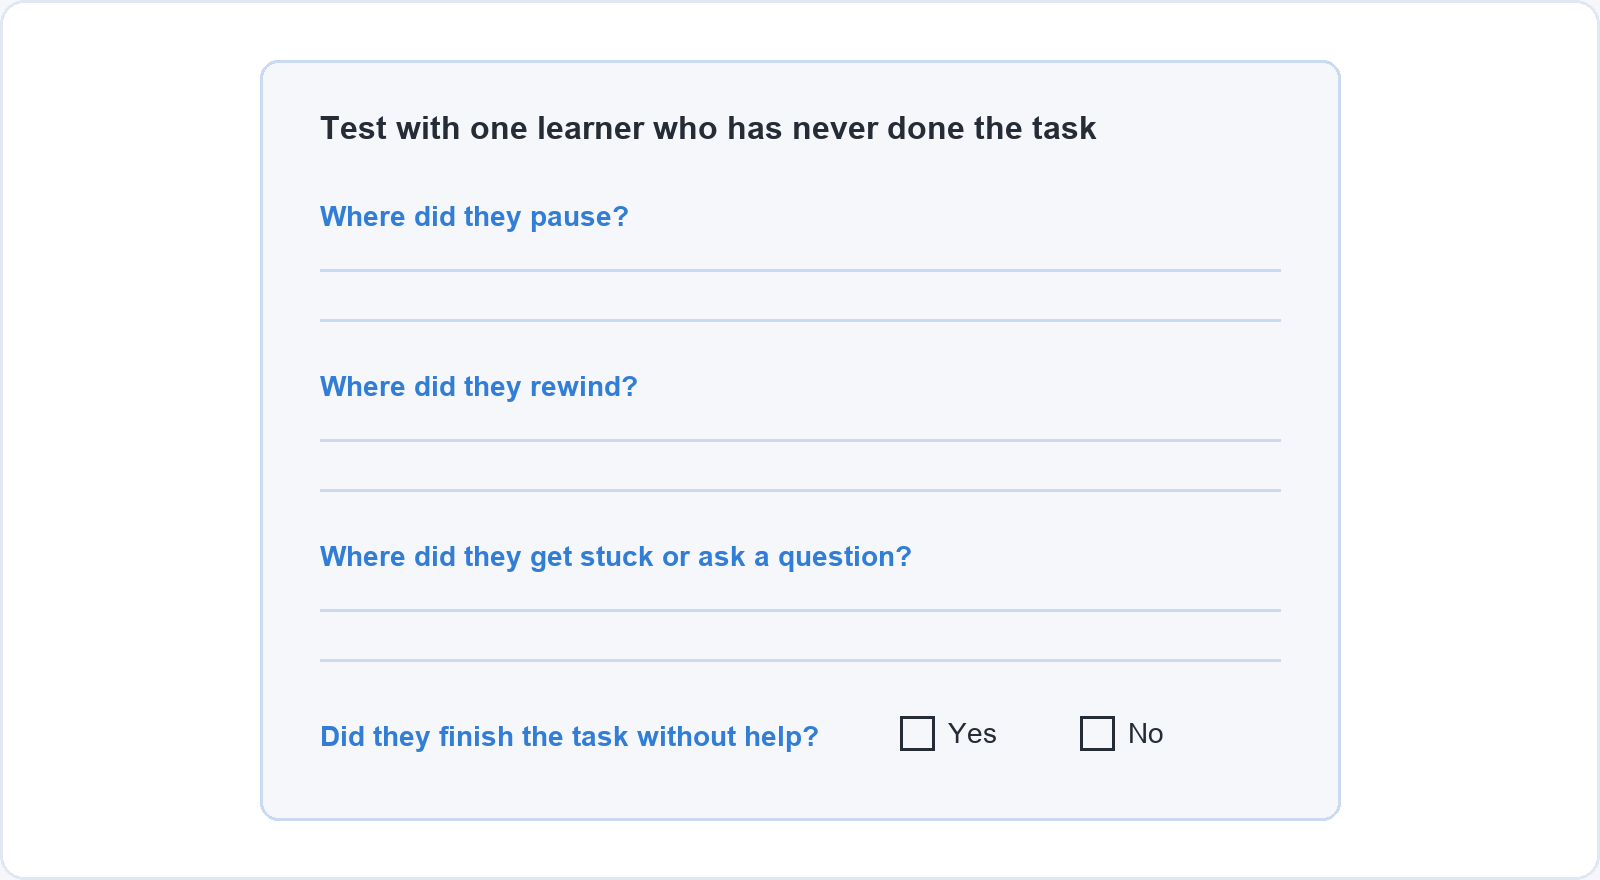
Then test it. Give the video and the exercise to one person who has never done the task, watch them without helping, and write down where they pause, where they rewind and where they get stuck. A rewind at the same spot twice means that step is too fast or the screen is unclear there. If they finish the task, the video works. If they do not, the point where they stopped is the step to re-record.
Questions people ask about instructional videos
How long should an instructional video be?
As long as one task takes to show, which for most software tasks is one to three minutes. The van der Meij Word tutorial averaged just over a minute per video. For lecture-style videos the edX data points to under six minutes. A longer process should be a series of short videos rather than one long one.
What equipment do I need to make an instructional video?
A laptop or computer, a microphone that sits close to your mouth, and a camera or smartphone that records at 720p or better. For a screen recording you also need screen-recording software, and both Windows and macOS include a basic screen recorder. Spend money on the microphone before anything else.
Should I show my face in an instructional video?
For software tasks, the screen matters more than your face, but a short shot of you at the start and end makes the video feel personal. The edX study found that videos which cut between slides and the instructor’s face held attention better than slides alone. For a physical skill, show your hands at the viewer’s own angle.
Do I need a full script?
For a screen recording, a two-column script keeps your words in step with your clicks and saves a lot of editing time. For a talk to camera or a hands-on demonstration, a list of the steps and the key phrases is usually enough, and you will sound more natural.
How do I know if my instructional video is any good?
Watch someone who has never done the task follow it without your help. If they complete the task, the video is good. Every point where they pause, rewind or ask a question shows you a step to fix.
Turn your videos into a course
A set of good instructional videos on related tasks is most of a course already. If you would like to publish yours, you can teach on Soofos: placing a course is free, Soofos hosts the video and handles payments and learner support, and every course is checked before it goes live, with a practical checklist to help you prepare it.